
1. Redux
Redux는 자바스크립트 상태관리 라이브러리이다.
React뿐만 아니라 Augular, jQuery, vanilla JavaScript 등 다양한 프레임워크와 함께 작동할수있도록 설계되었다.
https://ko.redux.js.org/introduction/getting-started/
Redux 시작하기 | Redux
소개 > 시작하기: Redux를 배우고 사용하기 위한 자료
ko.redux.js.org
1) Redux 설치하기
Redux를 사용하기 위해서는 redux, react-redux를 설치해야한다.
npm install redux react-redux;
2) Redux가 상태를 관리하는 순서
Action ➡ Dispatch ➡ Reducer ➡ Store
- 상태가 변경되어야 하는 이벤트 발생
- 변경될 상태에 대한 정보가 담긴 Action 객체 생성
- Action 객체가 Dispatch 함수의 인자로 전달됨
- Dispatch 함수가 Action 객체를 Reducer 함수로 전달해줌
- Reducer 함수가 Action 객체의 값을 확인하고 그 값에 따라 전역 상태 저장소 Store의 상태를 변경함
- 상태가 변경되고 React가 화면을 다시 렌더링 함
(1) Store
Redux 앱의 상태가 저장되어 관리되는 오직 하나뿐인 전역 상태 저장소.
createStore 메서드를 활용해 Reducer를 연결하여 Store를 생성한다.
import { createStore } from 'redux';

const store = createStore(rootReducer);
(2) Reducer
Dispatch에서 전달받은 Action 객체의 type 값에 따라서 상태를 변경시키는 함수.
이때 Reducer는 순수함수여야만 한다. 외부 요인으로 인해 기대한 값이 아닌 다른 값으로 상태가 변경되지 않아야 하기 때문이다.
const count = 1

// Reducer를 생성할 때에는 초기 상태를 인자로 요구합니다.
const counterReducer = (state = count, action) => {

  // Action 객체의 type 값에 따라 분기하는 switch 조건문입니다.
  switch (action.type) {

    //action === 'INCREASE'일 경우
    case 'INCREASE':
			return state + 1

    // action === 'DECREASE'일 경우
    case 'DECREASE':
			return state - 1

    // action === 'SET_NUMBER'일 경우
    case 'SET_NUMBER':
			return action.payload

    // 해당 되는 경우가 없을 땐 기존 상태를 그대로 리턴
    default:
      return state;
	}
}
// Reducer가 리턴하는 값이 새로운 상태가 됩니다.
Reducer 함수의 첫번째 인자에는 기존 state가 들어오게 되는데, 반드시 default value를 설정해주어야 한다.
설정해주지 않으면 undefined가 할당되기 때문에 오류가 발생할수 있다.
두번째 인자로는 action 객체가 들어오게 된다. 그리고 이 action 객체에서 정의한 type에 따라 새로운 state를 리턴하게 된다. 새로운 state는 전역 변수 저장소 Store에 저장되게 된다.
여러개의 Reducer를 사용하는 경우, Redux의 combineReducers 메서드를 사용해 하나의 Reducer로 합쳐줄 수 있다.
import { combineReducers } from 'redux';

const rootReducer = combineReducers({
  counterReducer,
  anyReducer,
  ...
});
(3) Action
이벤트가 발생했을때 어떤 액션을 취할 것인지 정의해 놓은 객체.
Dispatch 함수를 통해 Reducer 함수의 두번째 인자로 전달된다.
// payload가 필요 없는 경우
{ type: 'INCREASE' }

// payload가 필요한 경우
{ type: 'SET_NUMBER', payload: 5 }
type은 해당 Action 객체가 어떤 동작을 하는지 명시해주는 역할을 하기 때문에 필수로 지정해주어야 한다.
type은 대문자와 Snake Case로 작성한다. 필요에 따라서 payload를 작성해 구체적인 값을 전달한다.
보통 Action을 직접 작성하기보다는 Action 객체를 생성하는 함수를 만들어서 사용하는 경우가 많다.
=> 액션 생성자(Action Creator)
// payload가 필요 없는 경우
const increase = () => {
  return {
    type: 'INCREASE'
  }
}

// payload가 필요한 경우
const setNumber = (num) => {
  return {
    type: 'SET_NUMBER',
    payload: num
  }
}
(4) Disptach
Reducer로 Action을 전달해주는 함수. Dispatch의 전달 인자로 Action 객체가 전달된다.
Action 객체를 전달받은 Dispatch 함수는 Reducer를 호출한다.
// Action 객체를 직접 작성하는 경우
dispatch( { type: 'INCREASE' } );
dispatch( { type: 'SET_NUMBER', payload: 5 } );

// 액션 생성자(Action Creator)를 사용하는 경우
dispatch( increase() );
dispatch( setNumber(5) );
3) Redux Hooks
Redux Hooks는 React-Redux에서 Redux를 사용할때 활용할 수 있는 Hooks 메서드를 제공한다.
Redux Hooks는 'react-redux'에서 불러와야 한다.
(1) useDispatch()
Action 객체를 Reducer로 전달해주는 Dispatch 함수를 반환하는 메서드이다.
import { useDispatch } from 'react-redux'

const dispatch = useDispatch()
dispatch( increase() )
console.log(counter) // 2

dispatch( setNumber(5) )
console.log(counter) // 5
(2) useSelector()
컴포넌트와 state를 연결하여 Redux의 state에 접근할 수 있게 해주는 메서드이다.
// Redux Hooks 메서드는 'redux'가 아니라 'react-redux'에서 불러옵니다.
import { useSelector } from 'react-redux'
const counter = useSelector(state => state)
console.log(counter) // 1
4) Redux의 세가지 원칙
1. Single source of truth
동일한 데이터는 항상 같은 곳에서 가지고 와야 한다.
=> Redux에는 데이터를 저장하는 단 하나뿐인 Store가 있다.
2. State is read-only
상태는 읽기 전용이다. React에서 상태 갱신 함수로만 상태를 변경할수 있듯이 Redux의 상태도 직접 변경할수 없다.
=> Action 객체가 있어야만 상태를 변경할 수 있다.
3. Changes are made with pure functions
변경은 순수함수로만 가능하다.
=> Reducer는 순수 함수로 작성되어야 한다.
5) Redux 예시
구현 목표
+, - 버튼을 통해 숫자를 증감시키는 간단한 카운팅 앱
Store 생성
프로젝트에 redux, react-redux를 설치했다고 가정한다.
import React from 'react';
import { createRoot } from 'react-dom/client';
import { Provider } from 'react-redux'; // 1 Provider import
import { legacy_createStore as createStore } from 'redux'; // 2 createStore import
import App from './App';

const rootElement = document.getElementById('root');
const root = createRoot(rootElement);

const reducer = () => {} // 3 reducer 함수 생성

const store = createStore(reducer); // 4 createStore 메서드로 store 만들어주고 변수에 할당

root.render(
  <Provider store={store}> // 5 App을 Provider로 감싸고 store props 설정
    <App />
  </Provider>
);
1. index.js에 react-redux에서 Provider를 가져와 import 한다.
Provider는 store를 손쉽게 사용할 수 있게 해주는 컴포넌트이다. Provider를 불러와서 store를 사용할 컴포넌트를 감싸주고 props로 store를 설정해주면 하위 컴포넌트들에서 store에 접근할 수 있다.
2. redux에서 createStore(legacy_createStore)를 가져와 import한다.
createStore 메서드를 통해 Store를 생성할 수 있다. 인자로는 Reducer 함수를 넣어주어야 한다.
3. store의 상태를 변경할 reducer 함수의 틀만 작성해 함수 표현식으로 작성한다.
4. 변수 store에 createStore 메서드를 사용해 store를 만들어주고, reducer를 인자로 넣어준다.
5. App에서 store를 사용할 수 있도록 Provieder 컴포넌트로 감싸주고 변수 store를 props로 설정한다.
Reducer 함수 작성
const count = 1; // 6 초기값 설정

const reducer = (state = count, action) => { // 7 인자 넣어주기. state의 기본값을 설정
  switch (action.type) { // 8 switch case문으로 각 액션마다 실행할 내용 작성
    case 'INCREASE' : // action.type이 INCREASE이면 실행
    return state + 1;

    case 'DECREASE' : // action.type이 DECREASE이면 실행
    return state - 1;

    default : // 해당하는 경우가 없을때는 기본값을 리턴
    return state;
  }
}
7. 초기값이 되어줄 변수 count를 선언하고 값을 1로 설정한다.
8. Action 객체의 type 값에 따라 상태를 변경시키기 위해 switch case문으로 함수를 작성한다.
action.type이 INCREASE일 경우 state에 1을 더한다.
action.type이 DECREASE일 경우 state에 1을 뺀다.
해당되는 경우가 없을경우 기존 상태를 그대로 리턴하기 위해 default를 작성한다.
Reducer는 순수함수여야함으로 작성할때 주의한다.
액션 생성자(Action Creator)를 통한 Action 작성
export const increase = () => {
  return {type: 'INCREASE'}
}

export const decrease = () => {
  return {type: 'DECREASE'}
}
9. 각각 증가와 감소를 위해 필요한 Action을 액션 생성자를 통해 생성하도록 작성했다.
다른 파일에서도 두 함수를 사용하기 위해 export 키워드를 사용했다.
useDispatch를 사용해 Dispatch 함수 작성
App.js에서 파일을 작성한다.
import React from 'react';
import './style.css';
import { useDispatch } from 'react-redux'; // 10 useDisptach import
import { increase, decrease } from './index.js'; // 11 액션 생성자 import


export default function App() {
  const dispatch = useDispatch(); // 12 useDispatch()를 변수에 할당

  const plusNum = () => { // 13 dispatch를 전달할 이벤트 작성
    dispatch(increase());
  };

  const minusNum = () => {
    dispatch(decrease());
  };

  return (
    <div className="container">
      <h1>{`Count: ${1}`}</h1>
      <div>
        <button className="plusBtn" onClick={plusNum}>
          +
        </button>
        <button className="minusBtn" onClick={minusNum}>
          -
        </button>
      </div>
    </div>
  );
}
10. Dispatch 함수를 작성하기 위해 react-redux로부터 useDispatch를 import 한다.
11. dispatch로 전달해줄 액션 생성자 increase, decrease를 import 한다.
12. useDisptach()를 변수에 할당한다.
13. 각각의 버튼 클릭시 dispatch가 reducer를 호출하고 액션을 전달해주기 위해 dispatch 함수에 인자로 액션 생성자를 넣어 작성한다.
useSelector를 사용해 컴포넌트와 Store의 상태 연결
import React from 'react';
import './style.css';
import { useSelector, useDispatch } from 'react-redux'; // 14 useSelector import
import { increase, decrease } from './index.js';


export default function App() {
  const dispatch = useDispatch();
  const state = useSelector((state) => state); // 15 state 불러오기

  const plusNum = () => {
    dispatch(increase());
  };

  const minusNum = () => {
    dispatch(decrease());
  };

  return (
    <div className="container">
      <h1>{`Count: ${state}`}</h1> // 16 state를 컴포넌트와 연결
      <div>
        <button className="plusBtn" onClick={plusNum}>
          +
        </button>
        <button className="minusBtn" onClick={minusNum}>
          -
        </button>
      </div>
    </div>
  );
}
14. Redux의 state와 컴포넌트를 연결하기 위해 useSelector를 import 한다.
15. 변수 state에 useSelector로 state를 불러온다. 현재 설정된 state는 index.js에서 작성한 변수 count임으로 콘솔에 state를 출력해보면 1이 나오게 된다.
16. 버튼 클릭시 증감되는 state가 보여지도록 h1 태그 내에 state를 넣어준다.
리팩토링
여러 역할을 하는 코드들을 한 곳에 작성하는 것은 옳지 않다.
코드의 가독성이 매우 나빠지고, 오류 발생시 디버깅이 매우 어려워지기 때문이다.
위의 예시는 다음과 같은 형태로 리팩토링 할 수 있다.
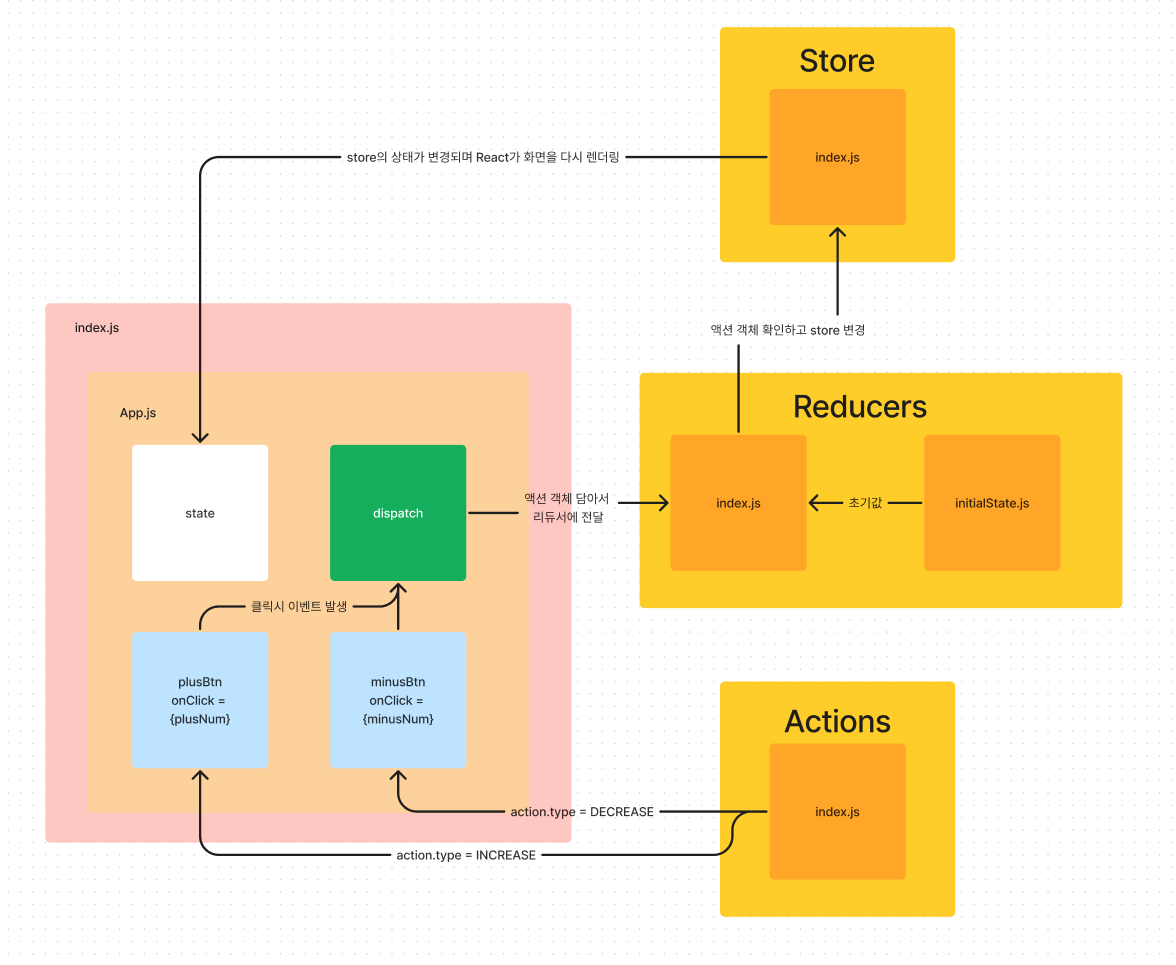
코드는 아래와 같다.
index.js
import React from 'react';
import { createRoot } from 'react-dom/client';
import App from './App';
import { Provider } from 'react-redux';
import { store } from './Store';

const rootElement = document.getElementById('root');
const root = createRoot(rootElement);


root.render(
  <Provider store={store}>
    <App />
  </Provider>
);
Store/index.js
import { legacy_createStore as createStore } from 'redux';
import { counterReducer } from '../Reducers';

export const store = createStore(counterReducer);
Reducers/initialState.js
export const initialState = 1;
Reducers/index.js
import { initialState } from './initialState.js';
import { INCREASE, DECREASE, increase, decrease } from '../Actions';

export const counterReducer = (state = initialState, action) => {
  switch (action.type) {
    case INCREASE:
    return state + 1;

    case DECREASE:
    return state - 1;

    default:
    return state;
  }
}
Actions/index.js
export const INCREASE = 'INCREASE';
export const DECREASE = 'DECREASE';

export const increase = () => {
  return {
    type: INCREASE,
  };
};

export const decrease = () => {
  return {
    type: DECREASE,
  }
}
App.js
import React from 'react';
import './style.css';
import { useSelector, useDispatch } from 'react-redux';
import { increase, decrease } from './Actions';

export default function App() {
  const dispatch = useDispatch();
  const state = useSelector(state => state);

  const plusNum = () => {
    dispatch(increase())
  };

  const minusNum = () => {
    dispatch(decrease())
  };

  return (
    <div className="container">
      <h1>{`Count: ${state}`}</h1>
      <div>
        <button className="plusBtn" onClick={plusNum}>
          +
        </button>
        <button className="minusBtn" onClick={minusNum}>
          -
        </button>
      </div>
    </div>
  );
}'study > TIL' 카테고리의 다른 글
| 23.02.28 - 웹표준, SEO (0) | 2023.02.28 |
|---|---|
| 23.02.27 - Redux Middleware, Redux-Thunk (0) | 2023.02.27 |
| 23.02.23 - 상태 관리 (0) | 2023.02.23 |
| 23.02.20 - Component Driven Development, Styled Components, Storybook, useRef (0) | 2023.02.20 |
| 221228 - CLI, Git 기초 (0) | 2023.02.19 |